
We all want to raise children who love to read, right? Every homeschool parent I know wants to raise children who love to read. But the process of teaching children how to read can be daunting. I have found a gentle, but structured approach that works well for my family. I recently shared my Love for All About Reading. Today I'm sharing my tips and tricks for using the All About Reading program.
We have used All About Reading Pre-Reading, All About Reading Level 1, All About Reading Level 2, All About Reading Level 3, and are beginning All About Reading Level 4.
In using multiple levels of this program, I have learned some practical tips and tricks for using All About Reading that I hope will be helpful for your homeschool.
Tips & Tricks for All About Reading
1 - Take advantage of the online placement tests
My oldest started with AAR Level 2 and has worked his way to AAR Level 4. We used several other reading programs before trying All About Reading. It was then that his reading really took off. I do believe it was a matter of timing and the right approach to teaching reading that helped reading "click" for him. So if your child is already reading some, go ahead and check out the placement tests to see what level would be right for your student.
The recommendation for All About Spelling is to begin with Level 1 and progress at the student's pace to ensure they have a good foundation of spelling rules. However, for All About Reading, there are online placement tests to help you determine the right level to begin with your student.
* If you have any questions about where to start, give All About Learning Press a call for guidance. They are so helpful and knowledgeable. In fact, they provide LIFETIME support on their products!
2 - Decide how you want to store your letter tiles
All About Learning Press recommends a 2'x3' magnetic white board for the tiles. Go for this bigger size board if you can. We started using AAR with a smaller one. Once we were able to move to the larger size board, it made our lessons flow a little easier because our tiles stay organized.
I realize everyone's home and budget is different. There are other options - a smaller magnetic white board, a metal cookie sheet, the floor or a table. But the 2'X3' magnetic whiteboard is the ideal size to use with All About Reading and All About Spelling. You can find these boards at office supply stores, big box stores, and Amazon. Prices vary. But make sure you get one that is magnetic.
We use our white board on a small table where the kids can write and move the tiles around easily at their level. I have seen others who mount their boards on the wall. Since we don't have ours on the wall, we do have to have a place to store it when it's not in use. Since we use it daily, our board gets handled quite often.
If you don't have a magnetic board to store the tiles on, you will have to lay out the tiles for each lesson before you can begin. Ideally, you will have a 2'x3' magnetic white board and either mount it on the wall or have it accessible to put on the floor or a table to use during your reading lessons each day.
You will also need a place to store the tiles you'll need for future lessons. I just keep ours in a plastic bag where I keep my teacher's manuals. If you have toddlers, you'll want to keep the tiles out of reach until they are a little older.
You use the same magnetic white board and tiles with All About Reading and All About Spelling if you use both programs.

3 - Organize your materials up front
Each level of All About Reading requires a Student Pack which includes the activity book and cards that will need to be prepped before your lessons. You need one student pack for each student that you are teaching at the same time. You can save the activities and cards for use with your younger children as long as you won't be teaching them on the same level at the same time. I wanted to organize my materials to reduce prep time for each lesson and to keep them organized to use again with my younger child.
- Tear apart the phonogram and word cards and put them into a card storage box. This is simple enough, just takes a while to do.
- Put magnets on the back of all the tiles. Again, this takes some time, but this prep work up front will save time later on.
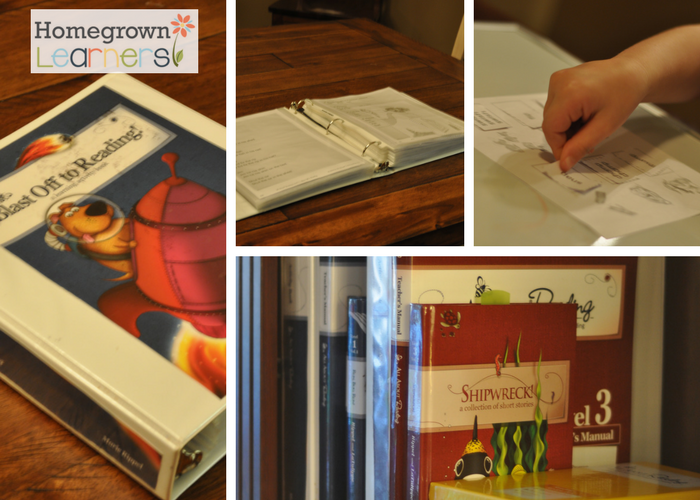
- The activity book contains simple activities that need to be prepared. I take a 3 ring binder and put each lesson's activity pages in a page protector. I prepare the activities that require cutting or stapling. Once I have gone through the activity book and put everything into page protectors, I'm left with the cover and spine of the activity book. I cut those up and insert them into the spine and front cover of the 3 ring binder. As we approach each new lesson, I pull out the page protector containing that day's lesson and store it in my teacher's manual until we have completed that lesson. Then I put it back in the binder and pull out the new one for the next day.
If you will be starting this program at the beginning of the school year, take time to organize during the summer. Or if you'll be starting this program mid-year like I have, just plan enough time to do this prep work before you are ready to begin using the program. I find I'm more consistent in using curriculum that I have organized.
This organization does take some time up front. I like to do this while I listen to a podcast or audio book to help pass the time.
4 - Get a card storage box
All About Learning Press offers a Reading Review Box to store the phonogram and words cards. When we started All About Reading and All About Spelling with my son a few years ago, I didn't order the Reading Review Box. I thought it would be easy enough to just use an index card box that I already had. A typical index card box isn't large enough to hold all the cards in it at once (except for the pre-reading level). I ended up buying a big index card box similar to this one on Amazon. I keep my son's current All About Reading and All About Spelling cards in this one box.
When my daughter began All About Reading Level 1, I bought the Reading Review Box. It's nice because it has spacers in it that can be removed as we add more levels. You'll need a reading interactive kit to be used with all levels of All About Reading. The Reading Review Box is included in the deluxe reading interactive kit or you can buy it separately.

5 - Read the teacher's manual and go at your child's pace
If you have only looked at the All About Reading materials online and have never put your hands on them, this snippet of a typical lesson may help you understand how all the components work together.
This truly is a multi-sensory approach.
The AAR Teacher's Manual guides you step by step through each lesson. Here's a quick rundown of how the different components are used in a typical lesson:
- Review phonogram and word cards taught in previous lessons
- Use the magnetic phonogram and letter tiles as you work through the new lesson
- Do the assigned activities and reading practice pages from the activity book
- Introduce any new phonogram and/or word cards for the lesson
- Student reads aloud assigned stories from their AAR reader about every other lesson or so
How long each lesson takes will depend on you and your child. If you prep your materials ahead of time (see #3 above :-) ) , it will save you precious time during the lesson when you have your child's attention. All About Reading recommends about 20 minutes per session.
Go at a pace that works for your child. This is a beautiful benefit of homeschooling - being able to personalize your child's education.
You can work through an entire lesson in one day or spread it out over multiple days. Set a timer or stop when you realize your child is getting tired even if the lesson isn't "completed" yet. Pick back up in the same place the next day. When we split lessons up over multiple days, I still do the review of the phonogram and word cards when we pick back up on our lesson.

I'm thrilled to share these Tips & Tricks for All About Reading with you in hopes that it will help you and your children on your journey to reading success. All About Reading is an investment. It has more to organize than some other programs. But it is thorough. It is multi-sensory. It works.
If you have used this program before, what are your tips and tricks for using All About Reading?
If you have found these tips and tricks helpful, I'd love to hear from you. Leave me a comment below!
